Take full control of your Blogger website’s SEO and ensure every post and page is properly indexed by Google and Bing—generate your complete, fully optimized XML sitemap instantly using the tool below:
Ensure your Blogger site is fully optimized for Google and Bing search consoles with a correct XML sitemap. Many bloggers—both new and experienced—mistakenly rely on sitemaps like:
https://example.com/atom.xml?redirect=...
⚠️ Warning: This sitemap is incorrect, as it only includes posts and excludes pages.
Here’s why it matters:
- ✅ Google recommends a sitemap that covers both Posts and Pages in Blogger.
- ❌ Using an incomplete sitemap slows down indexing and ranking of your pages, even though posts may still get indexed.
- 🚀 Correctly structured sitemaps improve visibility and performance for your entire blog.
Why Our Blogger Templates Stand Out:
- Our templates provide schema, meta tags, and descriptions for both posts and pages—unlike other templates that only support posts.
- You can verify schema support using the Google Schema Test Tool.
- After installing our template, generate your optimized XML sitemap with the tool below to maximize SEO benefits.
Optimize Your Blogger SEO with the Right XML Sitemap
- ✅ Comprehensive Sitemap: Create an XML sitemap that includes both Posts and Pages, fully compatible with Google and Bing.
- ⚠️ Avoid Indexing Issues: Incorrect sitemaps that include only posts slow down page indexing and ranking.
- 🚀 Boost Rankings with Our Templates: Our templates provide schema, meta tags, and descriptions for pages—not just posts—giving your blog an SEO edge.
- 🛠️ Verify Schema Support: Use the Google Schema Test Tool to ensure pages are schema-ready.
- 📝 Prevent Duplicate Content: All labels in our templates are marked as "no-index" to avoid Google penalties.
- 📌 Easy Sitemap Setup: After installing the template, generate your XML sitemap with the tool below and follow the demo screenshots to update it in your Blogger Dashboard.
How to Set Up a Sitemap in Blogger Settings
- Go to Blogger Dashboard → Settings → Crawlers and Indexing → Custom robots.txt.
- Copy the generated XML sitemap above.
- Paste it into the Custom robots.txt box
- Click Save.

How to Set Up a Sitemap in Google Search Console (GSC)
- Open your Google Search Console (GSC) dashboard.
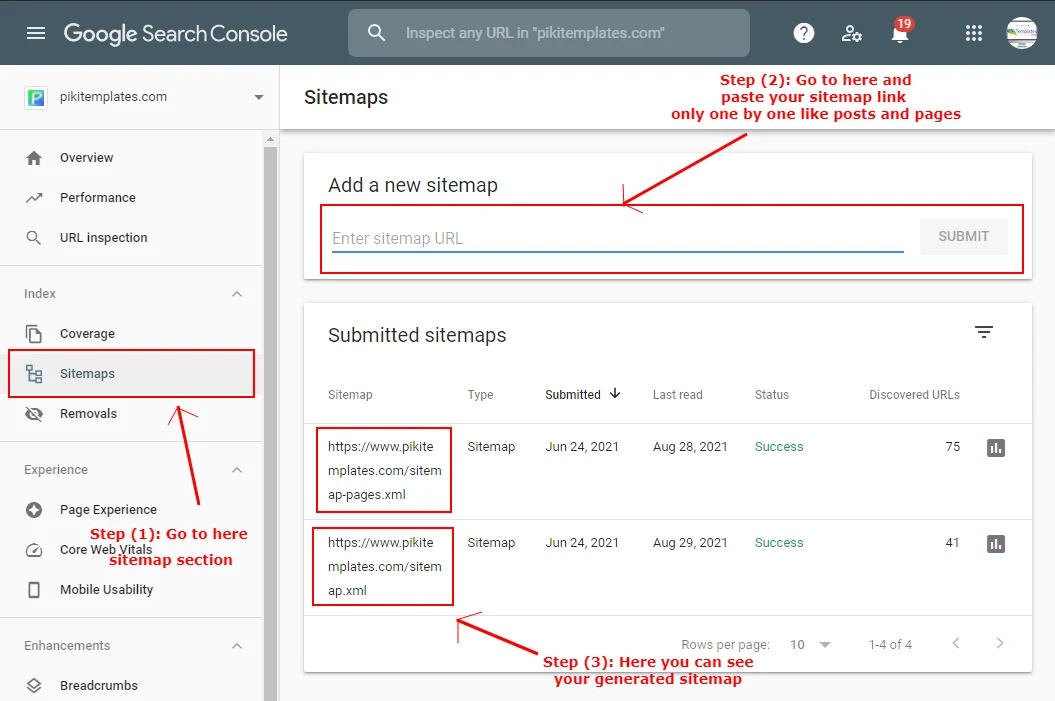
- Select Sitemaps from the left sidebar menu.
- Copy the two generated sitemap links (one for posts, one for pages).
- Paste each link one by one and click Submit.
- Check the attached demo screenshots for guidance.

How to Set Up Custom Robots.txt in Blogger
- Go to Blogger Dashboard → Settings → Crawling and Indexing.
- Enable Custom Robots.txt.
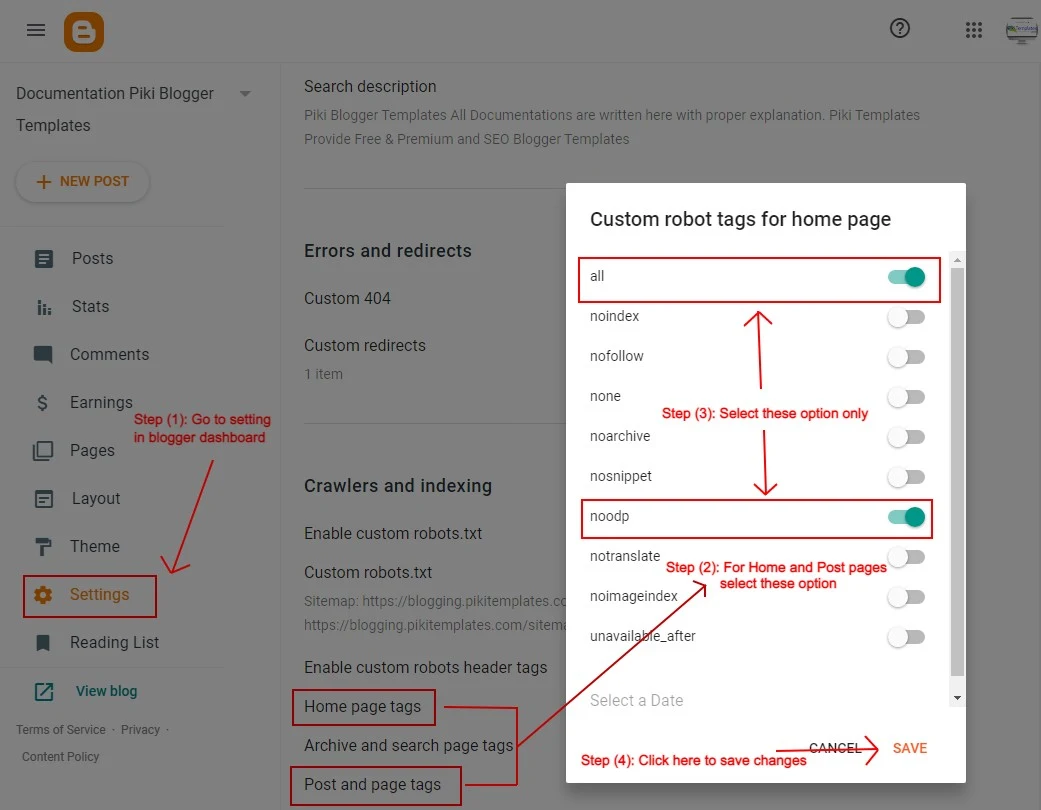
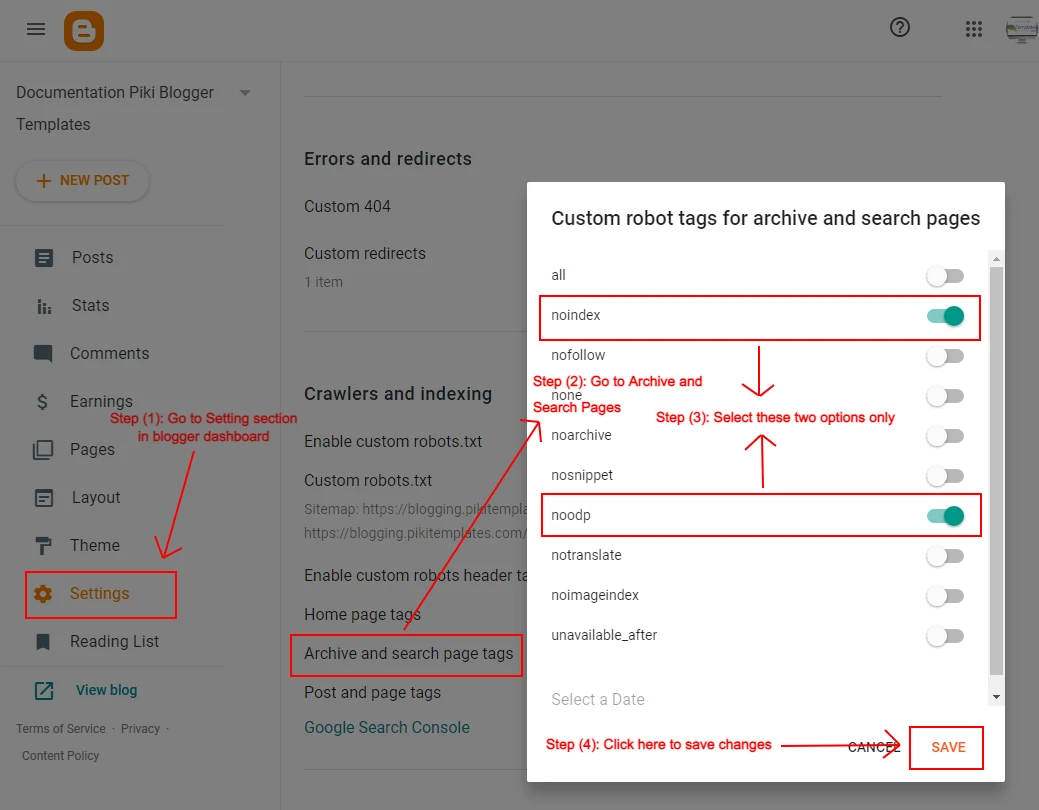
- Configure indexing options as shown in the attached screenshots:
- Use the settings provided in the screenshot.
- Set Index to Follow so that your home page, posts, and pages can be properly indexed by search engines.

(ii) Archived Pages:
- Use the settings provided in the screenshot.
- Set Noindex and Noodp because archived pages should not be indexed.

✅ Your Custom Robots.txt is now correctly configured for optimal SEO.
An XML sitemap is an essential tool for bloggers, helping Google easily read and index every post and page for better ranking. Always keep your sitemap updated and stay tuned for new tips on SEO and Blogger optimization.
Sharing is caring: Share this article with friends and fellow bloggers to help them generate the correct sitemap and improve their blog’s visibility. You can even write a blog post to raise awareness among the blogging community.
